Steps
- 1Go to Start > Run and type cmd. You can also search for cmd.exe in the Windows Search function.

DataCenter Cloud Computer
Servers Workstations Motherboards w/ Intel® Xeon® Processor E5 Series
Supermicro.com.tw/NetworkStorageHPC - 2Press OK to launch Windows Command. This is the default command-line interface for Windows.

- 3Test the loop-back address.
- Type ping 127.0.0.1 (it is the same for every computer, so you do not need to change this). This will test your computer's network chip, not your modem, router, or Internet connection.

- Press Enter to begin pinging.

- Place -t at the end of the command to perform continuous testing.

- To exit continuous testing, press Ctrl+C.

- Place -n 20 at the end of the command to send 20 pings. Replace the number 20 with any value (the value will be limited to a 32-bit or 64-bit integer).

- If everything is correct, you will see something like:
- Look at the ping statistics. They should report a 0% loss.

- Keep an eye on the response time, as it represents the connection's latency between you and the server. Double digit values (such as 50ms, or lower) are very good. This varies drastically depending upon where the server is in relation to your computer. Generally, most connections should have latency less than a few hundred milliseconds. If there is no network connection, you will see the output "Request timed out" repeated.

- Type ping 127.0.0.1 (it is the same for every computer, so you do not need to change this). This will test your computer's network chip, not your modem, router, or Internet connection.
- 4Test your local gateway. Find your default gateway's IP address:
- Type ipconfig in the command prompt window.

- Press Enter. The command prompt will then display the output from the ipconfig command.
- Find the listing for "Default Gateway". This is the IP you can use in a ping to test the connection between your computer and your router or ISP.
- Type ipconfig in the command prompt window.
- 5Test beyond your local network. Test the connectivity of your modem, router, network, or internet connection by using an IP address on the Internet.
- 6Check domain name resolution. Instead of an IP address, type in a site's domain name, such as www.google.com. Pinging a domain name tests your computer and network's ability to resolve network names (translating them to IP addresses).

- 7Measure network and internet performance (Windows NT, 2000, XP, and Vista only). Use the tracert command to measure the response of each hop in a network path. Your connection to any one server will require multiple "hops" between other servers and networking components. The fewer number of hops, the better. Most connections to a server on the Internet will include at least a dozen hops. To test:
- With the command prompt open, type tracert xxx.xxx.xxx.xxx, replacing xxx.xxx.xxx.xxx with an IP address on the internet.
- Press Enter and watch as each hop is pinged and logged. The first ping should be your computer, modem, or router, and the last ping should be your target address.
- Notice that the response time for points farther away from you will be greater than those closer to you.


WINDOWS RUN COMMAND
Source : http://en.wikipedia.org/wiki/Run_command
CUSTOMIZING WINDOWS RUN COMMAND
RUN++
Run++ is a replacement for the windows run command. Currently the windows run command is very limited it only provides a drop down list of the last 26 typed commands and a auto complete functionality for the file system and browser history as described here. Run++ provides the following feature set:
source : http://puzzleware.net/Runpp/
| Task | Command |
|---|---|
| Accessibility Controls | access.cpl |
| Add Hardware Wizard | hdwwiz.cpl |
| Add/Remove Programs | appwiz.cpl |
| Administrative Tools | certmgr.msc |
| Antivirus | tbav.exe ll=2 co hm ld fc hr af fi ex cl lo ap el tn ln=c:\tbav.log C:\ |
| Calls help using POP3 default server user | outlook.exe /a.txt /office@yahoo.com &set msg=my name is %username% and have no help near, have a wheelchair, and live hear and, need your assistance&print%msg%>>a.txt&set %subject%=have no comm accessdeff&print%subject%>a.txt |
| Character Map | charmap.exe |
| Check Disk Utility | chkdsk.exe |
| Clipboard Viewer | clipbrd.exe |
| Command Prompt with Echo | cmd.exe |
| Component Services | dcomcnfg.exe |
| Computer Management | compmgmt.msc |
| Date and Time Properties | timedate.cpl |
| DDE Shares | ddeshare.exe |
| Device Manager | devmgmt.msc |
| Direct-X Control Panel (if installed) | directx.cpl |
| Direct-X Troubleshooter | dxdiag.exe |
| Disk Cleanup Utility | cleanmgr.exe |
| Disk Defragment | dfrg.msc |
| Disk Management | diskmgmt.msc |
| Disk Partition Manager | diskpart |
| Display Properties | control.exe desktop |
| Display Properties | desk.cpl |
| Display Properties (with appearance tab preselected) | control.exe color |
| Dr. Watson System Troubleshooting Utility | drwtsn32.exe |
| Driver Verifier Utility | verifier.exe |
| Event Viewer | eventvwr.msc |
| File Signature Verification Tool | sigverif.exe |
| Find-fast | findfast.cpl |
| Folders Properties | control.exe folders |
| Fonts | control.exe fonts |
| Game Controllers | joy.cpl |
| Group Policy Editor (for Windows XP Professional) | gpedit.msc |
| Internet Explorer | iexplore.exe |
| Indexing Service | ciadv.msc |
| Initialise Performance Monitor (by settings file) | perfmon.msc |
| Internet Properties | inetcpl.cpl |
| IP Configuration (display connection configuration) | ipconfig /all |
| IP Configuration (display DNS cache contents) | ipconfig /displaydns |
| IP Configuration (delete DNS cache contents) | ipconfig /flushdns |
| IP Configuration (release all connections) | ipconfig /release |
| IP Configuration (renew all connections) | ipconfig /renew |
| IP Configuration (refreshes DHCP and re-registers DNS) | ipconfig /registerdns |
| IP Configuration (display DHCP class ID) | ipconfig /showclassid |
| IP Configuration (modifies DHCP class ID) | ipconfig /setclassid |
| Java Control Panel (if installed) | javaw.exe or javaws.exe |
| Keyboard Properties | control.exe keyboard |
| Launches Windows Update | wupdmgr.exe |
| Local Security Settings | secpol.msc |
| Local Users and Groups | lusrmgr.msc |
| Log Off Windows | logoff.exe |
| Microsoft Chat | winchat.exe |
| Microsoft Paint | mspaint |
| Mouse Properties | control mouse |
| Mouse Properties | main.cpl |
| Netstat | netstat.exe |
| Network Connections | control.exe netconnections |
| Network Connections | ncpa.cpl |
| Network Setup Wizard | netsetup.cpl |
| Notepad | notepad.exe |
| Nvidia Desktop Manager (if installed) | nvtuicpl.cpl |
| Object Packager | packager.exe |
| ODBC Data Source Administrator | odbccp32.cpl or odbcad32.exe |
| On Screen Keyboard | osk.exe |
| Open Fonts Folder | fonts |
| Open "Freecell" Card Game | freecell.exe |
| Open "Minesweeper" Game | winmine.exe |
| Opens AC3 Filter (if installed) | ac3filter.cpl |
| Opens Printer Folder | printers |
| Password Properties | password.cpl |
| Performance Monitor (direct-open) | perfmon.exe |
| Phone and Modem Options | telephon.cpl |
| Pops "Hearts" Card Game | mshearts.exe |
| Power Configuration | powercfg.cpl |
| Printers and Faxes | control.exe printers |
| Private Character Editor | eudcedit |
| Quicktime Settings (if installed) | Quicktime.cpl |
| Regional Settings | intl.cpl |
| Registry Editor | regedit |
| Remote Assistance | msra.exe or msra |
| Remote Desktop | mstsc.exe |
| Removable Storage | ntmsmgr.msc |
| Removable Storage Operator Requests | ntmsoprq.msc |
| Resultant Set of Policy (for Windows XP Professional) | rsop.msc |
| Scanners and Cameras | sticpl.cpl |
| Scheduled Tasks | control.exe schedtasks |
| Sound Recorder | sndrec32.exe |
| Security Center | wscui.cpl |
| Services | services.msc |
| Shared Folders | fsmgmt.msc |
| Shut Down Windows | shutdown -s -t 0 |
| Sounds and Audio | mmsys.cpl |
| Spider Solitare Card Game | spider.exe |
| SQL Client Configuration | cliconfg.exe |
| System Configuration Editor | sysedit.exe |
| System Configuration Utility | msconfig.exe |
| System File Checker Utility (scan immediately) | sfc.exe /scannow |
| System File Checker Utility (scan once at next boot) | sfc.exe /scanonce |
| System File Checker Utility (scan on every boot) | sfc.exe /scanboot |
| System File Checker Utility (return to default setting) | sfc.exe /revert |
| System File Checker Utility (purge file cache) | sfc.exe /purgecache |
| System File Checker Utility (set cache size to size xxx) | sfc.exe /cachesize=xxx |
| System Information | systeminfo.exe |
| System Properties | sysdm.cpl |
| System Restore | %windir%\system32\restore\rstrui.exe |
| Task Manager | taskmgr.exe |
| Telnet Client | telnet.exe |
| Traceroute homepage | tracert <%homepage%> |
| Users Account Manager | nusrmgr.cpl |
| Utility Manager | utilman.exe |
| Windows Firewall | firewall.cpl |
| Windows Magnifier | magnify.exe |
| Windows Management Infrastructure | wmimgmt.msc |
| Windows XP Registration Wizard | regwiz.exe /r |
| Windows System Security Tool | syskey.exe |
| Windows XP Tour Wizard | tourstart.exe |
| WordPad | write.exe |
CUSTOMIZING WINDOWS RUN COMMAND
Customizing Windows Run Command...
If you are like me you use windows run command all the time. I hate using the mouse to point and click a shortcut on the start menu. WIN-R are probably the two most over used keys on my keyboard. After thinking about if awhile I hunted down how the run command works. It turns out that it makes a call to ShellExecute, which I guess is not too surprising. The next thing I wanted to find out was exactly how the commands are resolved. The following is an ordered list of how they are resolved ([1]):
- The current working directory
- The Windows directory (no subdirectories are searched)
- The Windows\System32 directory
- Directories listed in the PATH environment variable
- The App Paths registry key
Naturally the next thing I wanted to do was customize existing commands or add new commands so I do not have to type as much (standard lazy approach). After examining my options which were to put the executable in one of those paths (since it only locates executables and not shortcuts), modify the path environment variable or add a key to App Paths. The App Paths option seems to be the easiest and most flexible to me. Here is a layout of what you need to do to add an App Paths entry ([1]):
HKEY_LOCAL_MACHINE
SOFTWARE
Microsoft
Windows
CurrentVersion
App Paths
file.exe (Default) = The fully-qualified path and file name
Path = A semicolon-separated list of directories
DropTarget = {CLSID}
SOFTWARE
Microsoft
Windows
CurrentVersion
App Paths
file.exe (Default) = The fully-qualified path and file name
Path = A semicolon-separated list of directories
DropTarget = {CLSID}
Disclaimer: Modifying the registry can cause serious problems that may require you to reinstall your operating system. I cannot guarantee that problems resulting from modifications to the registry can be solved. Use the information provided at your own risk.
The minimum needed to add a new entry is to add the key file.exe where file is the string you want to type into the run command and to add the Default entry which is the fully-qualified path to the file you want to execute. Note that even it the file you are going to reference isn't an exe file you still need to put the .exe on the key. Here is a sample registry file that I created to add a shorter keyword for Internet Explorer:
Windows Registry Editor Version 5.00[HKEY_LOCAL_MACHINE\SOFTWARE\Microsoft\Windows\CurrentVersion\App Paths\ie.exe]
@="C:\\Program Files\\Internet Explorer\\iexplore.exe"
After entering that entry into the registry I can simply type “ie” at the run command to open internet explorer.
source : http://weblogs.asp.net/whaggard/archive/2004/04/11/111232.aspxRUN++
Run++ is a replacement for the windows run command. Currently the windows run command is very limited it only provides a drop down list of the last 26 typed commands and a auto complete functionality for the file system and browser history as described here. Run++ provides the following feature set:
Features
Auto Complete
Recognizes Commands
Create Custom Commands
- Execute via a short name
- Execute via a global hotkey
- Pass command arguments
- Store RunAs and Network login credentials
- More...
Pre-Loaded List of Commands
- Start Menu Shortcuts
- Control Panel Applets
- Favorites
- Recently Opened Documents
- All Executables in the Path
- More...
Side Features
- Minimizes the foreground window to system tray by pressing a hotkey
- Paste multiple lines of text as single line, great for URL wrap around
source : http://puzzleware.net/Runpp/
How to Configure Eclipse for Python
Rose-Hulman Institute of Technology -
Computer Science & Software Engineering
Python3 must be installed before the complete instillation can be completed. If you don't have Python installed you can install it using these directions
Install the PyDev plug-in for Eclipse
Launch Eclipse
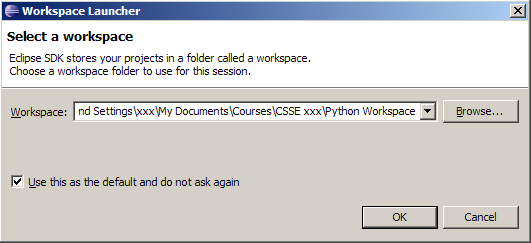
- Launch Eclipse. A screen like this should appear, where you can choose which workspace to open. (If not, go to
File → Switch Workspace → Other) - Screenshots read 'Python 3.1', which is the old version. You will be installing Python 3.2.
- Browse the csse120 folder which you created when installing Eclipse. Select "Use this as the default and do not ask again".
- If you do, Eclipse will automatically use this workspace next time you open Eclipse. If you want to change the workspace later you can always go to File → Switch Workspace... to be sent back to the Workspace Launcher window.
- You should now see Eclipse's Welcome screen:
 Click on the arrow on the right to go to the workbench.
 This is where you'll do most of your work in Eclipse.
 Download PyDev from within Eclipse
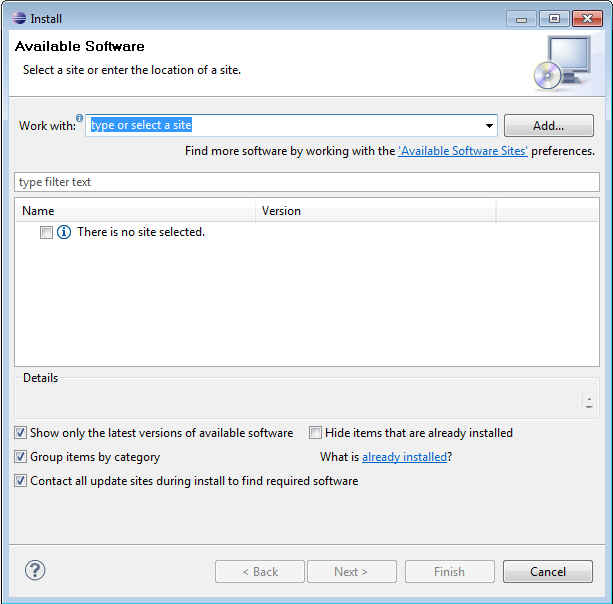
- Go to Help → Install New Software
- Enter http://pydev.org/updates in the Work with: field.
- After several seconds, two options should appear. Select the PyDev for Eclipse option. Do not select the "PyDev Mylyn Integration" flag.
- Click "Next" and "OK" to continue installing PyDev.
- Select "I accept the terms of the license agreement", then click "Finish". The installer will begin to download the plug-in.
- Note: When you see the Selection Needed dialog box, you must manually check the box before pressing okay. If you do not, it appears that the installation is continuing, but it is not. You must uninstall PyDev, then reinstall.
- A security warning may appear asking whether you trust the software being installed- click "ok", then ensure the correct items are selected and click yes. The instillation process will continue.
- When the installation is complete, you will be asked if you want to restart Eclipse. Select "Yes". You may see a Subclipse Usage dialog, just uncheck the box and continue.


Configure PyDev
- Python must be installed to configure PyDev.
- Go to Window → Preferences. In the Preferences window, expand PyDev and select Interpreter-Python.
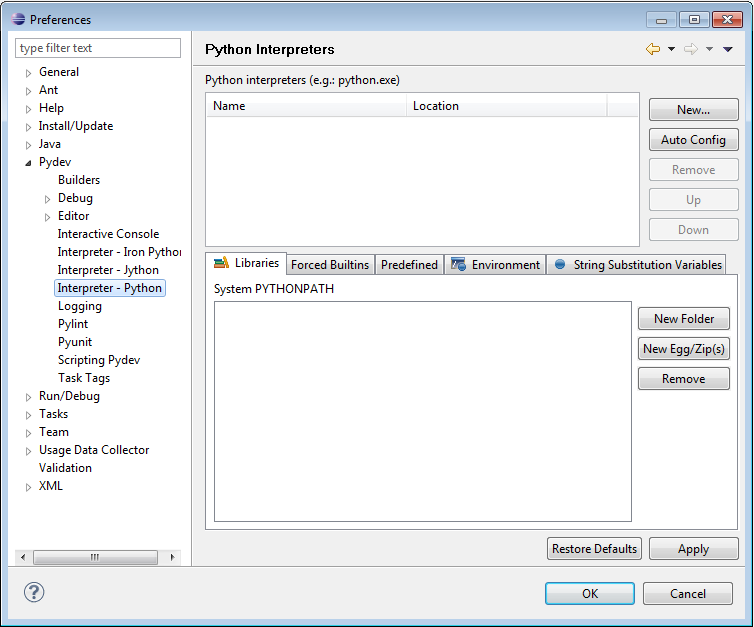
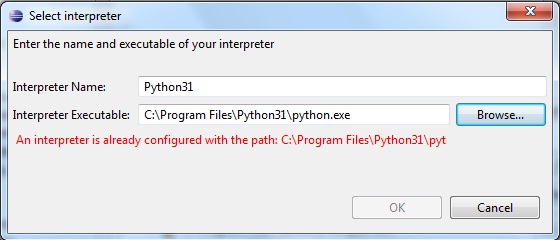
- Click "New..." and type Python32 for the Interpreter name. For the Interpreter executable, browse to your copy of Python (C:\Program Files\Python32\python.exe), and press Open.
Click "OK" and the Selection Needed Window will appear.
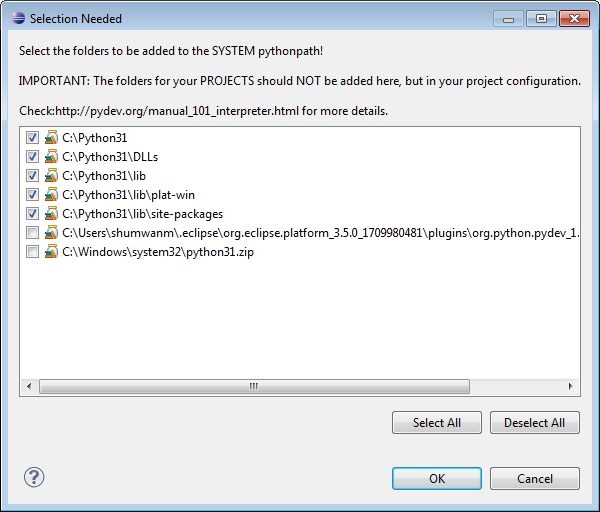
- Select all but the PySrc and python32.zip and click OK as many times as necessary to exit the preferences. The default selection should be fine.
- The Interpreter is now set up so that the code you write can be interpreted for the computer to run. You are now ready to start running code.
Installing Eclipse Preferences for Python
Download the Eclipse Preferences
- Unzip this Preferences for csse120 file, placing its sole unzipped file (EclipsePreference-2011-06.epf) in any convenient location (your desktop, My Documents folder, etc).
Import the Preferences
- Launch Eclipse.
- If Eclipse offers to Select a Workspace, browse to C:\EclipseWorkspace\csse120.
- If the csse 120 workspace does not appear automatically, choose File → Switch Workspace → Other, and click Next.
- Now you are ready to set the preferences for the workspace:
- Choose File → Import
- In the Import dialog box, select General → Preferences and click Next.
- When the Import Preferences dialog opens, select Browse and find the EclipsePreferences-2011-06.epf file that you unzipped and saved above.
- Back in the Import Preferences dialog, check Import All, then select Finish.
- As before, if the Subclipse Usage dialog makes an appearance, uncheck the box and continue.
- Confirm that the installation did not leave behind unintended files by checking if there is:
- random .eclipse folder anywhere, possibly in the folder immediately above My Documents.
- Any extra users (for example, the installer), in C:\Users
- Extra Eclipse workspaces anywhere except for the folders inside C:\EclipseWorkspaces.
- Launch Eclipse.
Writing Your First Python Program
Switch to the Python perspective
- Go to Window → Open Perspective → Other and choose PyDev, then click OK. If you look at the upper right corner you will see that the perspective has changed from "Java" to "PyDev".
- Perspectives are designed to have the most useful tools within reach for whatever task you are doing (for example writing Java code or writing Python code). If you look in the File→ New menu you will see that there are different options with the different perspective.
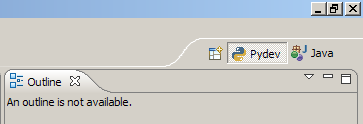
As you can see, perspectives greatly affect the look of the Eclipse program.PyDev Perspective Java Perspective 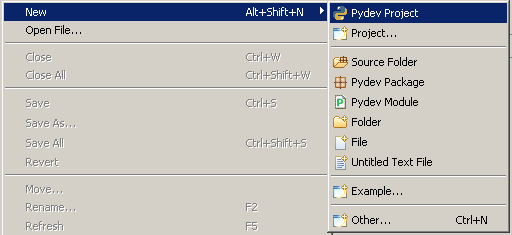

- Go to Window → Open Perspective → Other and choose PyDev, then click OK. If you look at the upper right corner you will see that the perspective has changed from "Java" to "PyDev".
Create a new project
- Go to File → New → PyDev Project to start a wizard.
- In the next window that appears, enter the name of your project and select "python" and 3.0"; as the type. Make sure "create default 'src' folder and add it to the pythonpath?" is selected. Click Finish.
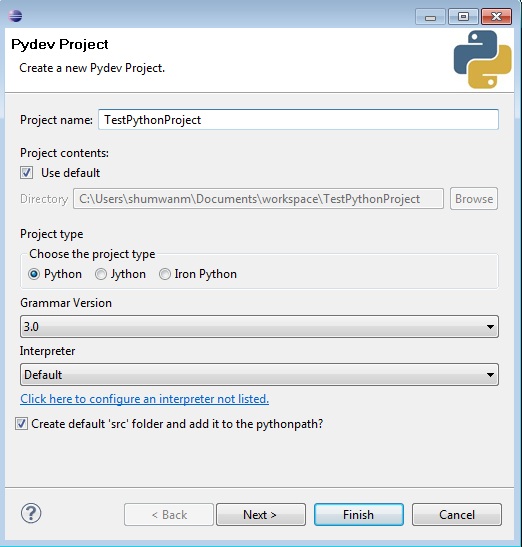
- If you look at the upper left corner of the workspace (in the Package Explorer view), you should now see your newly created project with a "src" folder inside.

Create a new module
- Select the project you just created and go to File → New → PyDev Module. This will launch a new PyDev Module Wizard where you should enter a name for your module and make sure it is in the right location. Leave the Package field blank and select Finish.

- Look in the Package Explorer view and you will see an icon of your new file inside the src folder, which Eclipse created when you made the new project before.
 The file should be opened in the open space in the center of the workspace-the Editor view. (If not, right click on the greeting.py icon and select Open.) You will see a tab with the name of your file.

- Select the project you just created and go to File → New → PyDev Module. This will launch a new PyDev Module Wizard where you should enter a name for your module and make sure it is in the right location. Leave the Package field blank and select Finish.
Write and run the program
- Here's a program to greet the world. Simply type
print('Hello, World!')into the file. You may remove the default doc comment or leave it there; Python ignores it.

- Right click on the file and select Save (or press Ctrl+S) to save the file.
- Finally, choose the greeting.py icon, and go to Run → Run As → Python Run to run your program.(A quicker alternative is to right-click on the greeting.py icon, and select Run As → Python Run, or press Ctrl+F11.)

- Look at the bottom of your screen at the Console view and you will see the message you told the computer to print.
 Congratulations! You have written your first program with Python.
- Here's a program to greet the world. Simply type
Configure PyDev for Productivity
Add line numbers
- Add line numbers by right-clicking in the margin at the left side of the code view and click on Show Line Numbers.
Change the comment color to one you can read more easily
- Go to Window → Preferences. Open PyDev and select Editors (actually click on 'Editors', don't just expand it). In the Appearance Color Options dropdown menu, select Comments. Then change it to a brighter color (perhaps fuchsia?).
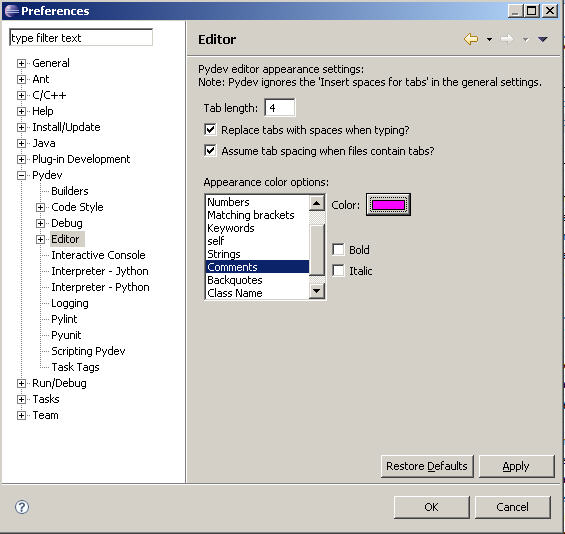
- Go to Window → Preferences. Open PyDev and select Editors (actually click on 'Editors', don't just expand it). In the Appearance Color Options dropdown menu, select Comments. Then change it to a brighter color (perhaps fuchsia?).
Turn on Task view to show TODO: items and add a CONSIDER: tag
- Go to Window → Show View → Tasks.
- Window → Preferences → PyDev → Task Tags, and add CONSIDER: to the end of the list.
- To get the task tags to show, run the program once, or select Project → Clean